Chicken coop ventilation: 21 design ideas with pictures
You know your chicken coop needs ventilation, but you’re not clear on exactly the best way to do that for your coop. Well, every chicken coop, no matter how big or how small, can be well-ventilated without causing drafts. You just need to figure out what kind of ventilation will work best for the type of coop you have.
In this article, I’ve compiled 21 different ideas for chicken coop ventilation. You’re sure to find ventilation solutions that’ll be just perfect for your coop!
And if you’re confused about what ventilation is or how much you need, check out my article, Chicken coop ventilation 101: Ventilation made easy!
This post contains affiliate links for my favorite products from Amazon, Etsy, and Rita Marie’s Chicken Coops. As an associate, I earn from qualifying purchases at no extra cost to you.
#1 Design your pop hole for good ventilation.
People often ask, “Does my pop hole door count as ventilation?” The answer is a resounding yes. Your pop hole door greatly influences the air flow in your coop and is a major part of your ventilation system.
In some chicken coops, particularly small ones, pop doors are the main form of ventilation. In some commercial chicken coops, they may be the only form of ventilation—you’ll want to add vents higher up in these cases, using some of the ideas in this article.
In most larger coops, pop doors are the only form of ventilation near the base of the coop. This is where much of the fresh air comes into the coop, where it then gets mixed with dust and moisture in the coop, then rises to vents higher up where it can finally leave the coop.
If you’re worried about not having enough ventilation in your coop, consider designing your pop door to be larger than average. This is an especially good idea if you live in a hot climate or a region that has particularly hot summers. Your chickens will appreciate all the airflow they can get.

If you get cold winters too, you can always cover your pop door in the winter with a curtain to keep out drafts. You can design the curtain to cover the whole pop door or just part of it.
You could even use a weather-resistant dog door flap over the pop door in the winter, like the one pictured here.
If your chickens are new to curtains, keep the curtains open at first, and then close one side for awhile, and finally close the other side as your chickens get used to going through them.
And if you’re new to chickens, make sure you close your pop hole door overnight to protect your chickens from predators.
For more on pop hole door design, see my article, Chicken coop pop doors: Size, height off the ground, and design ideas.
#2 Add a screen door to your coop.

A great way to add ventilation to your coop in warm temperatures is to add a screen door to your coop’s human door. This way you can leave the door to your coop open, adding loads of ventilation for your chickens.
If you have predators in the area, you’ll also want to cover the screen door with protective hardware cloth.
You could also just make a door out of hardware cloth and forget the screen altogether. However, the screen door ensures that flies and other bugs stay out—hardware cloth alone can’t do that
#3 Add a magnetic screen door to your coop.
Does building a screen door sound like too much work for you? There’s a simpler option.
If you have free-range chickens or your coop’s human door opens into your chickens’ enclosed run, you can add a magnetic screen door to your human door for a very low cost.
This is a great solution to add ventilation to your coop in hot weather. The magnetic screen door keeps flies out of your coop while increasing the airflow immensely. This is also a great way to keep your coop cool.
And you can easily remove the screen when the weather gets cold and store it away until next year.
You can see what one of these screen doors looks like below:
Be aware that your chickens could potentially use your magnetic screen door to leave the coop, and that may not be okay in your setting. You also should be aware that predators can easily get into the screen door too, so you wouldn’t want to leave your coop’s human door open overnight.
#4 Add shed windows to your coop.
If you need more ventilation in your coop, adding windows is hard to beat.
You can add a small shed window to the wall of your coop fairly easily and at low cost. And if you have a larger coop, consider adding a few!
The video below gives basic instructions on how to install your window.
Windows are best used as warm weather ventilation. You will typically want to keep your windows closed during the winter to prevent drafts in your coop.
However, if you have a tall coop, you could install windows near the top for winter ventilation as well. You will just need to be sure these windows are far above the chickens’ heads when they’re roosting. If the windows aren’t high enough above your chickens, your birds may feel drafts and get too cold.
If you do decide to add windows to your chicken coop, make sure you cover them with ¼-inch hardware cloth to keep predators out of your coop.

#5 Add a skylight window to your coop.
Another great way to increase the ventilation in your coop is to add a skylight window to your roof.

Skylight windows can be an amazing addition to a chicken coop. You can open the window up both for ventilation and to really help cool the coop down in the summer.
You can keep your skylight window open in the winter too if your coop is under a covered run (you don’t want precipitation getting in the coop). And if your coop is small, this is a great way to add ventilation to your coop above your chickens’ heads where it won’t blow cold wind across them.
If your coop isn’t in a covered run, you could keep your window closed in the winter, and let it actually help warm the coop. Yep, the sun will shine into your skylight window and add a little warmth. Your girls will thank you on those bitterly cold winter days.
If you do decide to add a skylight window to your chicken coop, make sure you cover the opening with ¼-inch hardware cloth to keep both predators and wild birds out of your coop.
#6 Design an open-wall coop.
If you live in a climate that’s hot and humid, you’ll definitely want to consider keeping your chickens in an open-wall coop. This is simply a coop that has at least one side of it open (i.e, without a wall). You’ll want to cover this open side with ¼-inch hardware cloth so your coop is predator-resistant.
In some climates, you may even find coops that are entirely open—having a roof and hardware cloth (or some other high-quality wire) making up all four sides. You can see an example of one these open coops below.

However, you do need to make sure your chickens are always dry and protected from any inclement weather. So, if you do have a coop with an open wall or two, make sure you have a plan on how to keep your birds dry, healthy, and safe during the occasional storm or downpour.
#7 Make a wall-roof gap.
One great way to design ventilation for both big and small coops is to leave a gap between the roof and at least one wall. This is easiest to do in a coop with a slanted roof (i.e., a lean-to-style coop), but it can be done on coops of other styles as well.
In the photos below you, you can see one of my chicken coops with this design. In the first photo, notice the roof is attached to the wall on the near side (with the window). The roof is also attached to the wall on the far side (out of view). But the roof is not directly attached to the other two walls—there are gaps between these walls and the roof.

You can see what this looks like up close in the next two photos. Here, you can see there is a gap between the roof and the wall (the wall shown here is also used as the human door into the coop). This gap extends across the wall and is covered with hardware cloth to keep predators out.

The opposite wall of this coop also has this ventilation gap.

This is one of the easiest ways to build a small coop with good ventilation that doesn’t result in drafts.
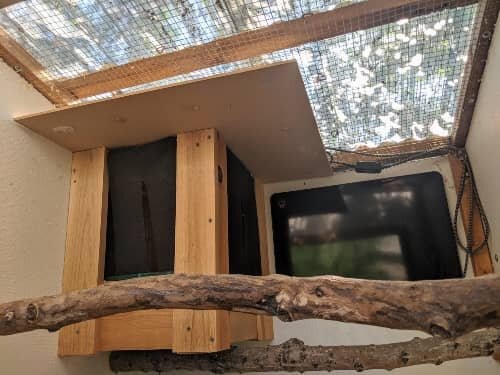
#8 Build a floating roof.
If you liked the design idea in #7, but you’re worried it still won’t give your chickens enough ventilation, consider building a floating roof instead.
A floating roof is a roof that’s not directly attached to any of your chicken coop walls. The roof instead is attached to 2x2s or 2x4s that are attached to the top of your coop. This type of roof means your coop’s entire ceiling is ventilated because the roof itself “floats” 3-4 inches above the coop
You can see what this looks like in the photos below. These photos come from my friend, Wendy from Eastern Idaho—she’s built multiple coops with this design from plans purchased from The Garden Coop.


This is an ingenious ventilation solution for small coops. If your coop is very small, you’re going to have a really hard time figuring out how to properly ventilate it. The problem with small coops is that any ventilation you add to the walls will result in drafts being blown across your chickens. Whereas drafts are perfectly fine in the hot summer months (welcomed, even), drafts in the winter are deadly.
The floating roof concept is one way to ventilate a small coop without adding wintertime drafts. You will need to cover your coop with ¼-inch or ½-inch hardware cloth to protect your chickens from predators. You can see what this looks like in the photos below.

Here’s something else that’s great about the floating roof: If your coop is feeling too cold in the winter months, all you have to do is slide insulation boards in between the hardware cloth and your floating roof! You can choose how much or how little ventilation you want. It couldn’t be easier!
And, depending on your particular situation, you may not need insulation boards. You may be able to get away with simple foam boards or even just leftover plywood or cardboard you have lying around.
You can see in Wendy’s photo below how she partially covers her coop ceiling in the cold months. Compare this to the photo above, which shows the same coop with the ceiling totally uncovered—perfect for warmer months!

You could also hang a Sweeter Heater from the 2x4 that runs across the ceiling in the cold months. This is an infrared heater that hangs over the roosting bars and protects your chickens from getting frostbite. I would never have a coop without one!
You can get Sweeter heaters on Amazon in small, medium, or large sizes.
If you’re interested in a designing a coop or run with this type of roof, check out the many plans at The Garden Coop. This store has incredibly detailed plans for coops of many different sizes and styles—and at reasonable prices too!
#9 Design an open ceiling.
If you like the floating roof idea (described above) and your coop is underneath a covered run, you may want to consider leaving the roof off altogether.
Your covered run will protect the coop from drafts and inclement weather, and your girls will have an incredibly ventilated coop—this may work especially well in the hot summer months.
I got this idea from my friend Wendy in Eastern Idaho. She built her first coop from The Garden Coop plans that featured the floating roof (described in the section above).
Wendy has just finished building her latest coop, and she decided it didn’t need a roof at all—aside from the hardware cloth cover for predator protection, of course. You can see what her new coop looks like in the photo below.

An open ceiling coop can always be partially or fully covered if needed by insulation boards, foam boards, plywood, or cardboard for extra protection from the weather. Below, you can see photos of Wendy’s open ceiling covered with simple rubber mats.
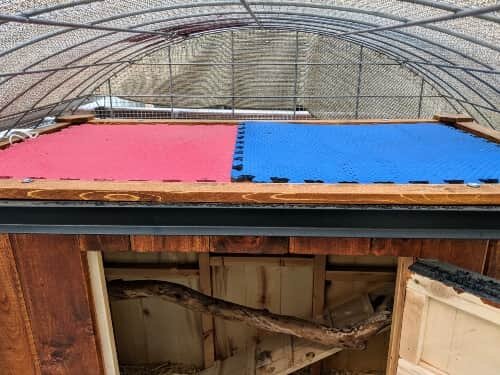

Wendy’s coop is housed underneath a hoop-style run. The run is covered with shade cloth in the summer and with heavy-duty vinyl in the winter, so the chickens are always protected from the weather. You can see what this looks like in the photos below.


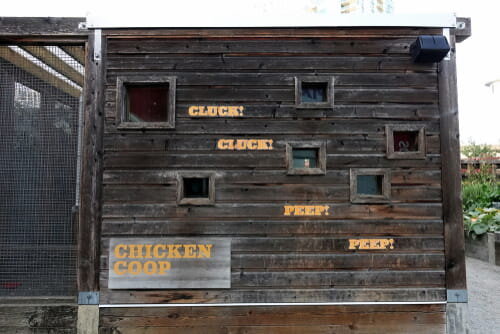
#10 Add circular holes in the wall near your coop’s ceiling.
One of the easiest ways to add ventilation to your coop is to drill some holes using a hole saw, which is a small saw that attaches to your drill. Drill these holes near your coop’s ceiling to avoid causing drafts for your chickens, and cover them with ¼-inch hardware cloth.
You can see what these holes look like in the picture of one of my coops below. Note that I cut these holes underneath my coop’s eaves so no wind or rain can get into the coop.

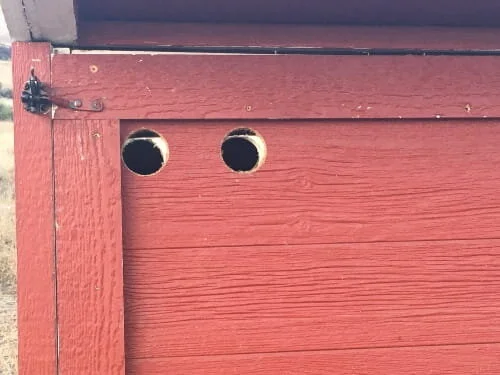
This is another good ventilation solution for small coops. You can add a lot of holes very high on the walls—as far above the roosting bars as possible.
Remember, you don’t want to add ventilation that blows below or across the roosting bars. Your chickens will get too cold in the winter and could suffer major frostbite or even death.
#11 Cut your own gable vents.
If your coop is designed with a peaked roof, gable vents are an excellent idea for you. A gable is the section of your coop that comes to a peak. The gable is one of the best places to add vents because it’s the highest part of the coop—when vented, it’s less likely to cause drafts.
To make the simplest gable vent, simply cut a hole in the gable and then cover it with ¼-inch hardware cloth. You can see an example of this in the photo below.

Or, you can design a cuter gable vent, such as the diamond- and heart-shaped vents seen in the two coops pictured below.


You do need to be sure that your gable vent doesn’t allow wind, rain, or snow to get blown into the coop. So, you’ll either want to position your vent under a roof with large eaves, or you’ll want to add a sliding cover or hinged flap to your vents.
You can see an example of a sliding cover over a gable vent in the photo below.

And in the photos below, you can see one of my chicken coops that has a hinged ventilation flap to keep inclement weather out of my coop. My flap isn’t painted, but it should be. Painting the flap not only makes it look better, but it also helps protect it from wood rot.


#12 Install stylish, pre-made gable vents.
You could also purchase a louvered gable vent. These vents have downward slats, or louvres, that are designed to keep out the sun, wind, and rain.
You can see an example of a louvered gable vent on the shed-style chicken coop below.

You can get these vents in many different shapes, sizes, and styles, and you can paint them to match your coop’s colors. This is an excellent choice for those of you who want something really cute for your coop.
However, be aware that you may not get as good of airflow through these vents as you do with the simple holes you cut yourself.
You can see examples of louvered gable vents below. If you like one of these, click on the image to see it on Amazon.


#13 Add (non-gable) wall vents.
You can also add vents anywhere you want along your coop’s walls.
However, remember that you don’t want cold air blowing below or across your chickens in the winter. So, you need to either add these vents well above your chickens’ heads, or you need to add sliding covers or hinged flaps to the vents so you can seal them up in cold weather.
You can see examples of sliding vent covers in the photos in the section above about cutting your own gable vents (see design idea #11).
And in the photos below, you can see examples of closed hinged flaps.


And in the photo below, you can see a hinged flap that’s adjacent to the chickens’ roosting bars. This kind of ventilation is excellent for chickens in the summer—your girls will love the fresh air—but these flaps absolutely need to be closed in cold or inclement weather.
You can also buy pre-made wall vents that will provide your chickens some protection from the weather, but won’t ventilate as well as the holes you cut yourself.
Again, you’ll want to make sure you cover all wall vents with ¼-inch hardware cloth to keep out predators, rodents, and wild birds.
#14 One word: cupola.
Cupolas on chicken coops are more than just decorative—these are roofed, vented boxes. There’s a reason old barns all seem to have one. Cupolas work exceptionally well for removing heat and moisture from animal housing.
Although cupolas are effective on their own, they work particularly well when combined with a roof ridge vent (see idea #18 below).
As an added bonus, cupolas can add a little light into your chicken coop too.
And let’s not forget, they make your coop look fantastic!

The cupola in the photo above is decorative, but real cupolas are an excellent way to add ventilation for your chickens.
#15 Add skylight vents to your coop’s roof.

A skylight-style vent is a type of roof vent. This is a vent that’s installed near the peak of your roof and is most effective when used in conjunction with wall or soffit vents. It’s translucent (not transparent), so it provides a bit of light for your girls, but much less so than a window.
The skylight vent is a great idea for coops that don’t have good natural light. It’s also a great vent for smaller coops—because it’s located in the roof, you don’t have to worry about drafts. It’s also much more affordable than cupolas or skylight windows (although less effective). You can add multiple skylight vents to your roof, though, if needed.
#16 Add turtle vents to your coop’s roof.

Turtle vents are also known as louvers. They are similar to skylight vents, except that they aren’t typically translucent and they work best with roof ridge vents (although they work well on their own too). You can add several turtle vents to your coop roof if you need to do so, depending on your coop’s size.
Turtle vents are another affordable option, and, because they’re located in the roof where they won’t create a draft, they’re great for small coops too.
#17 Add a wind turbine to your coop’s roof.

Another great way to add ventilation to your chicken coop is to add a Whirlybird wind turbine to the roof. This turbine will turn at even the tiniest breeze, and will suck hot, moist air out of your coop. These turbines are wonderful in hot areas and frigid areas alike for moisture and temperature control.
Wind turbines are also an excellent way to add ventilation to any coop without adding drafts. Properly installed, they are noiseless, and they also last a long, long time.
Another advantage of a wind turbine is that it often prevents birds from roosting on your coop because the birds don’t like the movement. This is especially great if you live in an area with birds of prey.
As with all vents, make sure you cover the opening in your roof with hardware cloth to keep your coop secure from predators, and to also ensure your chickens don’t fly up into the turbine.
Wind turbines are fairly easy to install. Check out the YouTube video below for easy instructions.
#18 Install roof ridge vents.

Roof ridge vents are an excellent option for chicken coop ventilation. These vents are simply covered openings located at the peak of your roof. (Unfortunately, if your roof isn’t peaked, ridge vents will not be an option for you.)
Because ridge vents are at the very peak of your coop’s roof, they are literally as high above your chickens’ heads as possible, and, therefore, the least drafty vents ever. And ridge vents are the only vents that vent the entire roof in a peaked chicken coop. Without ridge vents, some moist air will inevitably be trapped in your roof’s peak.
Roof ridge vents work best in conjunction with wall vents (see design ideas #10 and #13 above) or soffit vents. This is because warm, moist air is removed from the ridge vent while cooler, fresh air is pulled in from the wall or soffit vents. You can see what this looks like in the video below.
One word of warning, if you get heavy snows on your roof, sometimes ridge vents can get blocked by the snow. If you get a snow buildup on the peak of your roof, you’ll need to knock off the snow to ensure the ridge vent continues ventilating.
#19 Use fans in your chicken coop.

Fans are an excellent way to increase the airflow in your coop. There are a couple of different types of fans you can get.
Exhaust fans are the best for moving old, moist, stale air out of the coop. If you have electricity, you’ll want an exhaust fan that’s made for sheds, shops, or barns, such as the Ken Brown Exhaust Fan, available on Amazon.
Or, if you really want to splurge, you can get an exhaust fan that changes speeds based on the temperature and humidity, such as the AC Infinity AIRLIFT T10 Exhaust Fan. This type may actually save you money in the long run.
If you don’t have electricity, you can get solar-powered exhaust fans. Here are a few different types:
Solar Panel Powered Fan Mini Ventilator for small coops

If you buy an exhaust fan that isn’t enclosed in some kind of wire casing, be sure to add hardware cloth to the exposed side of the fan so that your chickens can’t fly into the blades and hurt themselves.
If your coop is small, you could also use a simple box-type fan designed for chicken coops. This can really help with airflow.
#20 Use an air exchanger in your chicken coop.

Some chicken keepers use air exchangers as part of their ventilation systems. These help to remove dust from the air, and are typically used by people who are keeping their chickens in shop- or garage-type structures.
I know of several bantam chicken keepers who use air exchangers in the winter. This is because many bantam breeds, such as Japanese Bantams and Sebrights, suffer in cold temperatures, and must be temporarily moved into warm garages, shops, or mudrooms. Air exchangers can be life savers in these instances.
#21 Use a portable air filter in your chicken coop.

An alternative to the air exchanger is a portable air filter. These are typically used in garages, shops, or house-type coops—that is, structures not originally built for chickens that may be harder to properly ventilate.
Portable air filters are also great for coop air quality during the summer and fall in the western states. Those of us who live in the west know how bad the air gets from wildfires, even when those fires aren’t that close (and when they’re close, even worse). Our chickens suffer greatly from this bad air quality and portable air filters can help.
Portable air filters vary significantly in cost and quality. You can find great portable air filters that are low-end, medium-end, or high-end products, depending on your needs.
Other chicken coop ventilation ideas
Do you have a great chicken coop ventilation idea that I missed? Share your idea in the comments below!
You may also be interested in:
The BEST luxury coop you’ll ever buy: Spoil your chickens with Rita Marie's
Chicken coop pop doors: Size, height off the ground, and design ideas